- PRODUCTO
TPV para restaurantes
TPV de restaurante escalable para cadenas internacionales
Pedidos de tabletas
Mejore la experiencia de sus clientes con una aplicación para servidores
Visualización de pedidos de clientes
Interacción con el cliente en tiempo real y mejora de los pedidos
Disposición de la mesa
Gestión eficaz de las mesas para optimizar la facturación
Software de reserva de restaurantes
Simplifique las reservas de mesas para mejorar la experiencia de los clientes y la eficacia operativa.
Gestión de existencias
Racionalice el inventario, reduzca los residuos y aumente la rentabilidad
Cocina básica
Software de cocina central para optimizar las operaciones
Gestión de recetas
Seguimiento preciso de los ingredientes de cocina para reducir los residuos
Gestión de la cadena de suministro
Logística sin estrés con nuestro software de suministro para restaurantes
Sistema de exposición en cocina
Controle el caos de la cocina con un sistema de exposición
sistema de producción de cocinas
Sistema de producción de cocinas preparado para el futuro
previsión
Prevea con precisión la demanda y optimice su inventario
MERCADO DE RESTAURACIÓN
Crecer con Restroworks
Asociación TECNOLÓGICA
Integraciones eficaces para el reparto de alimentos calientes y frescos
Software de análisis para restaurantes
Obtenga información que impulse el crecimiento
Aplicación Cockpit
Información en tiempo real sobre la marcha
Informes de empresa
Más de 200 informes para el éxito de los restaurantes basados en datos
Antirrobo
Evite los robos y proteja los beneficios de su restaurante con un software antirrobo
QUIOSCO DE AUTOSERVICIO
Software de autoservicio para quioscos RestroGO, independiente del hardware
PEDIDOS CON CÓDIGO QR
RestroScan para pedidos de mesa y comida para llevar con código QR
APLICACIÓN DE REPARTO DE COMIDA
Aplicación de la marca RestroAPP para comida a domicilio y reparto
SITIO WEB DE PEDIDOS EN LÍNEA
RestroWEB, su sitio web de pedidos en línea con su marca
- PLATAFORMA

API
Potencie sus integraciones con nuestra API abierta

Arquitectura de soluciones
Visión de éxito de 360° para una rentabilidad escalable.

Seguridad y conformidad
Seguridad de los datos más allá de las normas mundiales

ERP
Integración perfecta de ERP

Gestión de menús
Cree y gestione menús sin fisuras en todos sus locales

API
Potencie sus integraciones con nuestra API abierta

Arquitectura de soluciones
Visión de éxito de 360° para una rentabilidad escalable.

Seguridad y conformidad
Seguridad de los datos más allá de las normas mundiales

ERP
Integración perfecta de ERP

Gestión de menús
Gestione fácilmente los menús de todos sus locales
- SOLUCIONESPor función
Simplicidad para TI, operaciones, finanzas y más

tecnología de la información
Despliegue, gestión de TPV, seguimiento de ventas, inventario, generación de informes

OPERACIONES
Potencie las operaciones para una gestión eficaz y rentable de los restaurantes

Finanzas
Números de puntos de venta en tiempo real siempre a su alcance.

Propietario
Gestione recetas, costes, gastos y evite robos a distancia

Franquicia
Una solución para varias regiones y puntos de venta
Por formatoSolución en la nube adaptable para una gestión eficaz de los restaurantes

CENA FINA
Servir delicias que deleiten a los clientes

QSR
Solución integral de software QSR basada en la nube

Cocina en la nube
Coordinar múltiples cocinas y agregadores

CASUAL RÁPIDO
Tiempo de respuesta rápido como ningún otro

HOTELES
Sirva la felicidad con hospitalidad como nunca

FOOD Court
Eficacia en la gestión de áreas de restauración con gran afluencia de público

Bares y pubs
Mejore su ambiente con nuestras soluciones de gestión de bares

Catering
Dé rienda suelta a su creatividad culinaria con nuestra excelencia en gestión de catering

Café
Consiga el éxito con nuestras innovaciones de gestión centradas en la cafetería

Drive-thru
Aumente la eficiencia con nuestra suite de gestión de drive-thru optimizada

Banquetes
Transforme los eventos en experiencias memorables

Estadios
Gane a lo grande con nuestras soluciones de gestión de restaurantes centradas en los estadios

Cine
Experiencias de estreno, operaciones optimizadas con nuestras soluciones centradas en el cine

Panadería
Simplifique la gestión de inventarios, pedidos y operaciones.
- SOCIO
- RECURSOSEXPLORA
- EMPRESA
Quiénes somos
Conozca Restroworks Una plataforma líder de tecnología unificada para restaurantes
que permite a las cadenas globales prosperar.Ofertas de empleo actuales
Explorar ofertas de empleo en Restroworks
Eventos
Explore dónde está el software Restroworks
haciendo olas en el mundo de la restauración.Redacción
Lea lo último y lo mejor de la familia Restroworks
Conformidad
Seguridad, privacidad y cumplimiento en Restroworks
- Hablemos
- Obtener demostración
Doordash Help Center
Order Cancellations Management Guide
How to Void an Order and Notify the Aggregator
This guide explains how to cancel (void) an order from the Enterprise Dashboard. Voiding an
order ensures it is canceled both in our system and on the corresponding aggregator
platform.
Step 1: Access the Billing Screen
1. Log in to your Enterprise Dashboard.
2. Navigate to the Billing section from the main menu.
Step 2: Locate the Order to Cancel
1. In the Billing screen, find the order you want to cancel.
2. Use filters or search tools if needed to narrow down the list.
Step 3: Void the Order
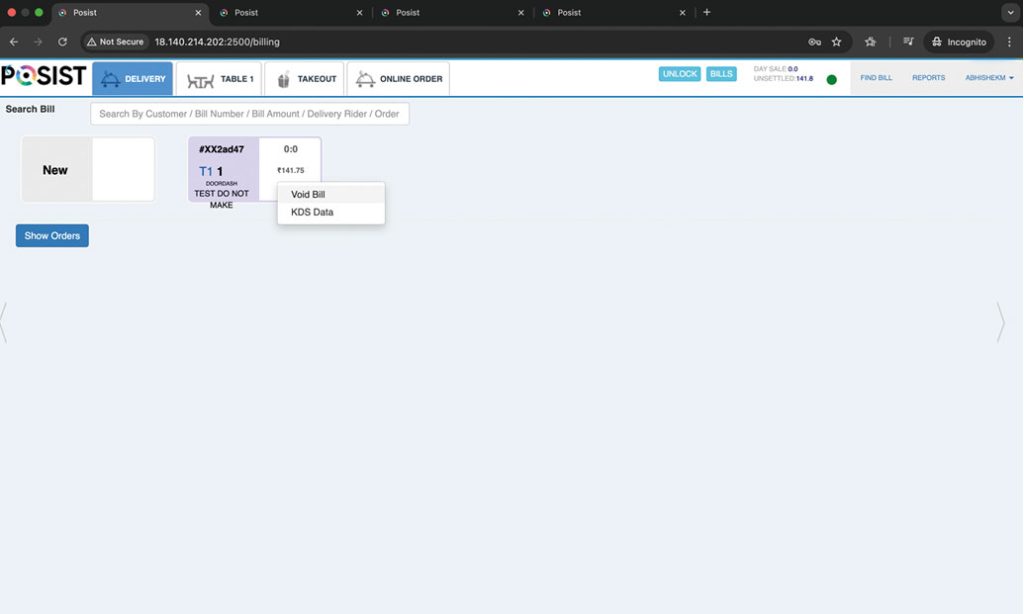
1. Right-click on the order you wish to cancel.
2. From the context menu, select “Void Order.”
Step 4: Provide a Void Comment
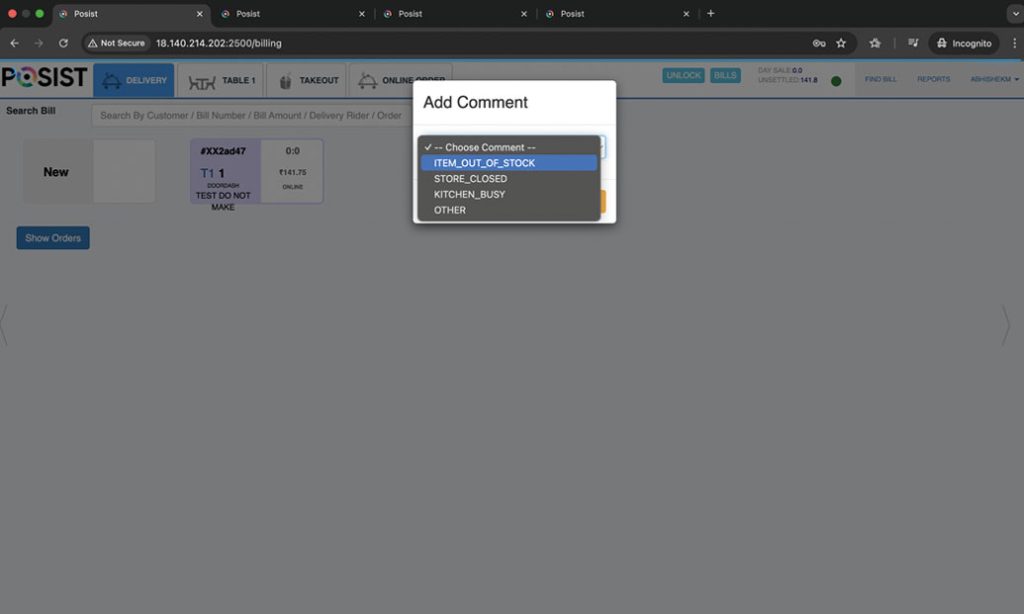
1. A prompt will appear requesting a void reason or comment.
2. Select the appropriate comment from the dropdown or enter one manually (if allowed).
3. Confirm the action.
Step 5: Completion
● The cancellation request will be sent to the aggregator platform automatically.
● The order will also be marked as voided within our internal system.
● Only users with proper permissions can void orders.
● Once voided, the action cannot be undone.
● Always ensure the correct void reason is selected for accurate reporting and
compliance.
Store Availability Management Guide
How to Activate or Deactivate a Store on an Aggregator Platform
This guide outlines the steps required to manage a store’s availability—specifically how to activate or deactivate a store—using the Enterprise Dashboard.
Step 1: Access the Billing Screen
- Log in to your Enterprise Dashboard.
- From the main navigation menu, go to the Billing section.
Step 2: Manage Aggregator Status
1. Within the Billing screen, locate and select the Aggregator Status option.
2. You’ll be prompted to enter the store’s Pincode (or ZIP code).
○ This helps filter and locate stores based on their geographic location.
Step 3: Locate the Desired Aggregator
1. After entering the pincode, a list of connected aggregators (e.g., DoorDash, UberEats, Grubhub) will appear.
2. Scroll through the list or use the search function to find DoorDash.
Step 4: Enable or Disable the Store
1. Next to the store listed under DoorDash, you’ll see a toggle or status switch.
2. To activate the store, set the status to Enabled or toggle it ON.
3. To deactivate the store, set the status to Disabled or toggle it OFF.
4. Confirm any prompts that may ask you to verify or save your changes.
● Changes in status may take a few minutes to reflect on the aggregator’s end.
● Ensure you have the necessary permissions to update store availability.
● This setting only affects visibility on the selected aggregator platform.
Order Manager for POS – DoorDash Plug-in Help Guide
How to Track DoorDash Orders via the POS Plug-in
This guide explains how to use the DoorDash plug-in within the POS system to track delivery orders in real time.
Step 1: Identify the Order
1. Navigate to the Order Manager screen in your POS system.
2. Locate the order that has recently landed and you wish to track.
Step 2: Open the DoorDash Tracking Plug-in
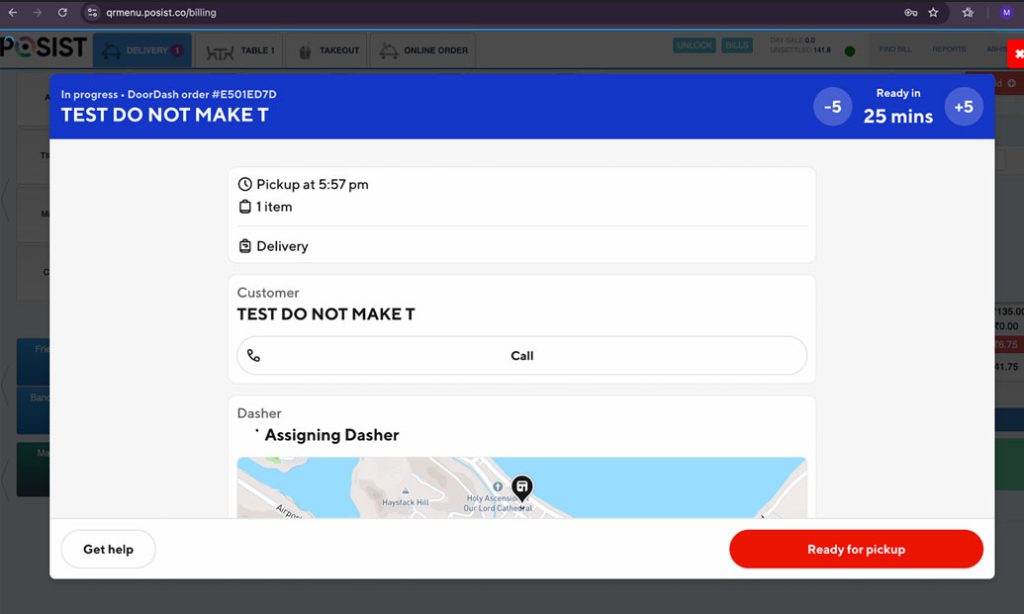
1. Click on the specific order to open its details view.
2. Look for and click the “Track DoorDash” button.
Step 3: View the Tracking Information
● A popup window will appear showing real-time tracking information provided by DoorDash.
● This may include the driver’s location, estimated delivery time, and order status updates.
Step 4: Close the Tracking Window
● To close the tracking screen, click the “X” (Close) button located at the top corner of the popup.
● The Track DoorDash button will only appear for orders placed via DoorDash.
● The tracking popup is view-only and cannot be edited.
● If tracking doesn’t load, ensure that your POS is properly connected to the DoorDash integration.
Menu Management Help Documentation
Overview
There are two primary ways to sync your DoorDash menu through the Restroworks panel:
1. Direct Push via Enterprise Integrations Panel:
Use this method to immediately push your menu.
2. Post-Push Processing and Monitoring:
After pushing your menu, allow time for backend processing. You can monitor the processing status using the logs available in the Enterprise Integrations Panel.
Once your menu is successfully pushed and processed, you can customize it further for each cluster:
● Cluster-Specific Customization:
Click on any cluster to open the Menu Management Panel. Here, you can actively manage various aspects of your menu, including:
○ Item Status: Enable or disable individual menu items.
○ Category Status: Update or change category settings.
○ Operating Hours: Modify open hours and special hours.
○ Additional Options: Manage other settings as needed through the Enterprise Integrations Dashboard.
Step-by-Step Guide
1. Sync the Menu:
○ Option A: Push the menu directly using the Enterprise Integrations Panel.
○ Option B: After the menu push, wait for the processing to complete. Tip: Check the logs panel in the Enterprise Integrations Panel to monitor the status.
2. Customize the Menu:
○ Select the desired cluster by clicking on it.
○ Open the Menu Management Panel.
○ Adjust and manage:
■ Item and Category Status
■ Regular and Special Operating Hours
■ Other Settings as Necessary
3.Utilize the Dashboard:
○ The Enterprise Integrations Dashboard provides comprehensive controls to fine-tune your menu’s presentation and ensure that all settings meet your operational requirements.
SSIO Onboarding Information Guide
Complete Instructions for Store Onboarding via SSIO (Third-Party Integration with
DoorDash)
Overview
This document outlines the steps for onboarding a store via the SSIO platform with
DoorDash integration, including troubleshooting common errors, managing menus, and
understanding onboarding status updates.
Step-by-Step Onboarding Process
1. Navigate to 3rd Party Integrations
● Log in to the Deployment-Level Dashboard.
● Go to the 3rd Party Integrations section.
2. Start Onboarding Process
● Click on “Onboard Store” to begin the process.
3. Authenticate with DoorDash
● You will be redirected to the DoorDash login screen.
● Log in with your DoorDash Business Admin credentials.
● Once authenticated, you’ll be taken to the POSist Dashboard.
4. Fetch Stores
● Click “Fetch Stores” to retrieve a list of all stores associated with your DoorDash account.
5. Select and Confirm Store
● Click on the store you’d like to onboard.
● A confirmation prompt will appear.
Upon confirming, the onboarding process will begin.
Happy Flow: Menu Auto-Ingestion & Activation
○ The system will automatically pull the menu for the selected store.
○ The menu will be qualified for DoorDash integration.
○ Once qualified, the “Activate” button will become clickable.
○ Prompt a final confirmation.
○ Activate the store for live orders on DoorDash.
○ Display a Menu Preview Link for final verification.
Error Handling & Troubleshooting
Common Onboarding Failures
A menu onboarding block (menu_block) may occur due to:
● Missing Item Hours in the menu
→ This can be resolved using the Enterprise Integrations Panel to assign
item-level hours.
Other Common Issues
Error Message
- No stores to select
- No business admin permissions
- Not eligible to onboard
Explanation
- No stores fetched from DoorDash account
- User lacks required access rights
- Store not supported for SSIO onboarding
Solution
- Ensure correct account is used; re-authenticate
- Use an account with Business Admin role
- Contact support for eligibility confirmation
Multiple Location Merchants
For merchants managing multiple locations:
● Bulk Onboarding Options:
○ CSV Upload: Merchants can request onboarding via a bulk CSV file through the Developer Portal.
○ Native Matching: A multi-location onboarding experience is available where stores can be matched and onboarded in batches.
Menu Management Guidelines
To ensure successful menu ingestion:
● Create or edit the store’s menu using the Enterprise Integrations Panel.
● Make sure each item:
○ Has a valid name, price, and category.
○ Is assigned appropriate item-level hours.
● Avoid duplicate items or unassigned categories.
● After the store is selected, DoorDash automatically attempts to ingest the menu.
Onboarding Status Updates
● Merchants will receive real-time updates on onboarding progress.
● Updates are communicated on the screen while onboarding is happening
● In case of issues, merchants can view status and action items directly from the dashboard.
Enable Integration
● Once onboarding and menu qualification are successful:
○ Merchants can activate the store via the dashboard.
○ Alternatively, they can log into the DoorDash Merchant Portal to manually
activate the store and start receiving orders.
● Activation is only successful if:
○ Menu is successfully ingested.
○ Store meets DoorDash’s onboarding requirements.
Support & Frequently Asked Questions
Contacting Support
If merchants encounter any issues during onboarding, they can reach out to the integration
support team via the dedicated helpdesk or integration support email.
Common FAQs
Use the Enterprise Integrations Panel to create, edit, and assign item hours before syncing.
Orders will be routed through your POS system once the integration is live.
Yes, use the pause/resume functionality available in your POS or DoorDash Merchant Portal.
Use the 86 item feature in your POS system to reflect real-time availability on DoorDash.
Store Hours Configuration Guide
How to Set Up Store Hours via the Enterprise Integrations Panel
This guide walks you through the process of configuring store hours using the enterprise integrations panel. Setting accurate store hours ensures that your store displays the correct availability to customers across all connected platforms.
Step 1: Access the Enterprise Integrations Panel
1. Log into the Enterprise Dashboard.
2. Navigate to the Clusters section.
3. Select the specific Cluster where the store(s) you want to manage are located.
4. Within the cluster, open the desired tab.
Step 2: Create a New Open Hours Schedule
1. Locate the Store Hours or Scheduling section within the panel.
2. Click on “Create New Schedule” (or similar, depending on UI terminology).
3. Name your schedule appropriately (e.g., “Standard Weekday Hours” or “Holiday Schedule”).
Step 3: Define Days and Hours of Operation
1. Choose the days of the week your store should be open (e.g., Monday–Friday).
2. Set specific opening and closing times for each selected day.
3. If your aggregator supports split shifts (e.g., lunch/dinner service), you may configure multiple time blocks per day.
4. Review your selections to ensure they accurately reflect the store’s real-world operating hours.
Step 4: Apply and Sync Schedule with Aggregator
1. Once your schedule is finalized, ensure it is associated with the appropriate aggregator(s) or store profiles.
2. Click “Sync Menu” or “Publish Changes” (depending on platform terminology).
3. This sync action will update both the menu and the store’s operating hours across all integrated aggregator platforms.
4. Confirm that the changes have propagated successfully by reviewing the store’s live status or aggregator dashboard.
Tips & Best Practices
● Always double-check time zones when configuring schedules for stores in different regions.
● Use descriptive names for each schedule to avoid confusion, especially when managing multiple stores or seasonal hours.
● Regularly review store hours for accuracy, especially around holidays or special events.
● If changes aren’t reflecting on the aggregator, ensure that the integration sync was successful and that the aggregator accepts hour updates via API.